UCTRONICS LCD35 RPI (SPI interface)
Contents
UCTRONICS 3.5 Inches 480 x 320 TFT LCD Touch Screen Display
Model: U4703
Introduction
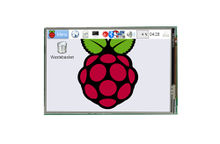
UCTRONICS 3.5" TFT LCD display module is designed for Raspberry Pi zero/Pi 2 /Pi 3 Model B / B+ and can also be used on other hardware platforms with have SPI interface. The 3.5" screen is the same size as the standard Raspberry Pi model B/B+, and well mate with the Raspberry Pi boards. With its touch screen, it is suitable for portable devices and projects, and it is a replacement for a heavy and bulky HDMI monitor, keyboard and mice. The highlight of this display module, it supports plug and play without reboot the Pi, and SPI speed runs as fast as 32MHz to support games and videos.
Specification
| Support Kernel from 4.1 to 4.9 | Support plug and play |
| Resolution: 480 x 320 pixels | Support touch screen |
| Interface: SPI | Support game and video |
| SPI speed: 32MHz | Automatic driver installation script |
| Dimension: 55.98 x 85.60 mm | Well mate with Pi Zero, Pi B+, Pi2 and Pi3 |
Hardware installation

Figure1 Figure2


The Figure 1 shows the display module pin out and dimension. Connect the 3.5inch LCD to the Raspberry Pi board like the Figure 2 shows. Power on the Raspberry Pi board and make sure the internet is connected properly. Note: LCD module pin1 should be aligned to Raspberry Pi board Pin1, misalign might cause damage.
Download and install driver
The LCD driver has been already installed in the Micro SD card shipped only with the kit that includes a Micro SD card. The following steps are for install the driver on a clean system. All the installation steps are also available from our github: https://github.com/UCTRONICS/UCTRONICS_LCD35_RPI/
- Step1 Expand the Micro SD card
sudo raspi-config
then Select Advanced Operations -> Expand Filesystem and hit YES , then go to Finish and you need to run sudo reboot to reboot your Raspberry Pi.
- Step2 Update your Raspberry Pi system
sudo apt-get update
- Step3 Download the driver package
sudo git clone https://github.com/UCTRONICS/UCTRONICS_LCD35_RPI.git
- Step4 Go to the UCTRONICS_LCD35_RPI
cd UCTRONICS_LCD35_RPI
- Step5 Change the file permission
sudo chmod 777 UCTRONICS_LCD_backup
sudo chmod 777 UCTRONICS_LCD35_install
sudo chmod 777 UCTRONICS_LCD_restore
sudo chmod 777 UCTRONICS_LCD_hdmi
- Step6 Backup original system data
sudo ./UCTRONICS_LCD_backup
- Step7 Install the LCD35 driver
sudo ./UCTRONICS_LCD35_install
Wait for a while the system will be installed and restarted automatically. If you want to reuse the original system, you can use the below command
sudo ./UCTRONICS_LCD_restore
If you want to display on HDMI instead of LCD, just use the below command
sudo ./UCTRONICS_LCD_hdmi
If you don’t want to run those command to install the LCD driver, we also provide ready to use system image file “UCTRONICS_LCD35_RPI.img". Please click the following link to download the system image file: http://uctronics.oss-us-west-1.aliyuncs.com/LCD35/image/UCTRONICS_LCD35_RPI.img Check the following link to install the win32diskimager tool in your computer. Then write the image file into the Micro SD card. https://sourceforge.net/projects/win32diskimager/
Add more functions to the LCD
Install calibration software for calibration
cd UCTRONICS_LCD35_RPI
sudo unzip Xinput-calibrator_0.7.5-1_armhf.zip
cd xinput-calibrator_0.7.5-1_armhf/
sudo dpkg -i -B xinput-calibrator_0.7.5-1_armhf.deb
Install virtual keyboard
- Step 1 Execute the following commands to install the corresponding software
sudo apt-get update
sudo apt-get install matchbox-keyboard
sudo nano /usr/bin/toggle-matchbox-keyboard.sh
- Step 2 Copy the following contents to toggle box - keyboard. Sh, save the exit
                   #!/bin/bash
                   #This script toggle the virtual keyboard
                   PID=pidof matchbox-keyboard
                   if [ ! -e $PID ]; then
                   killall matchbox-keyboard
                   else
                   matchbox-keyboard -s 50 extended&
                   fi
- Step 3 Execute the following command
sudo chmod +x /usr/bin/toggle-matchbox-keyboard.sh
sudo mkdir /usr/local/share/applications
sudo nano /usr/local/share/applications/toggle-matchbox-keyboard.desktop
- Step 4 Copy the following contents to toggle - matchbox - keyboard. Desktop, save exit
                   [Desktop Entry]
                   Name=Toggle Matchbox Keyboard
                   Comment=Toggle Matchbox Keyboard`
                   Exec=toggle-matchbox-keyboard.sh
                   Type=Application
                   Icon=matchbox-keyboard.png
                   Categories=Panel;Utility;MB
                   X-MB-INPUT-MECHANSIM=True
- Step 5 To perform the following command, note that this step must use the "PI" user permission, and if the administrator privileges are used, the file will not be found
nano ~/.config/lxpanel/LXDE-pi/panels/panel
- Step 6 Find similar commands (different versions of ICONS may differ)
                    Plugin {
                    type = launchbar
                    Config {
                    Button {
                    id=lxde-screenlock.desktop
                    }
                    Button {
                    id=lxde-logout.desktop
                    }
                    }
- Step 7 Add the following code to add a Button item
                  Button {
                  id=/usr/local/share/applications/toggle-matchbox-keyboard.desktop
                  }
- Step 8 To restart the system with the following command, you can see a virtual keyboard icon in the top left corner
sudo reboot
Contact us
If need any further support, please feel free to contact us.
| Website: http://www.uctronics.com |
|---|
| Email: [email protected] |
| Tel: +86 025 84271192 |
Trouble Shooting
How to add new ICON to desktop ?
If it's just a folder, add it directly to the desktop
If it is an executable, follow this steps:
- Step1: choose the Directory Tree -> / -> usr -> share ->applications folder
- Step2: choose a icon you want to link
- Step3: choose edit -> create link... ->Desktop ->OK
How to rotate the screen to 180 degree ?
cd UCTRONICS_LCD35_RPI
sudo chmod 777 UCTRONICS_LCD35_rotation_180_install
sudo ./UCTRONICS_LCD35_rotation_180_install
0 degree 180 degree


Some zones working much better than others, the near edge zones seem the worst.
- You should recalibrate the touchscreen.
- 1.Downloading our UCTRONICS_LCD35_HDMI_RPI package from https://github.com/UCTRONICS/UCTRONICS_LCD35_RPI.git
- 2.Install calibration software for calibration
cd UCTRONICS_LCD35_RPI
sudo unzip Xinput-calibrator_0.7.5-1_armhf.zip
cd xinput-calibrator_0.7.5-1_armhf/
sudo dpkg -i -B xinput-calibrator_0.7.5-1_armhf.deb


How to burn the UCTRONICS_LCD35_RPI.img?
- Step1: Download the burn tools from https://github.com/UCTRONICS/Win32DiskImager.git
- Step2: Download the UCTRONICS_LCD35_RPI.img file from
http://uctronics.oss-us-west-1.aliyuncs.com/LCD35/image/UCTRONICS_LCD35_RPI.img
- Step3: Open the SDFormatter to format your SD card
- Step4: Open the Win32DiskImager to write the UCTRONICS_LCD35_RPI.img to your SD card.
For more details please refer to our video demo from
https://www.youtube.com/watch?v=cCw91wH6mnc