Difference between revisions of "(SKU: B0105)Arducam ESP32 UNO Board for Arducam Mini Camera Module Compatible with Arduino UNO R3"
| Line 47: | Line 47: | ||
===Features=== | ===Features=== | ||
| − | * Build in ESP-32S Module | + | * Build in ESP-32S Module |
| − | * 26 digital input/output pins, IO ports are 3.3V tolerant | + | * 26 digital input/output pins, IO ports are 3.3V tolerant |
* Arducam Mini 2MP/5MP camera interface | * Arducam Mini 2MP/5MP camera interface | ||
* Lithium battery recharging 3.7V/500mA max | * Lithium battery recharging 3.7V/500mA max | ||
| Line 69: | Line 69: | ||
<center>[[Image:ESP8266-3.png|600px|]]</center> | <center>[[Image:ESP8266-3.png|600px|]]</center> | ||
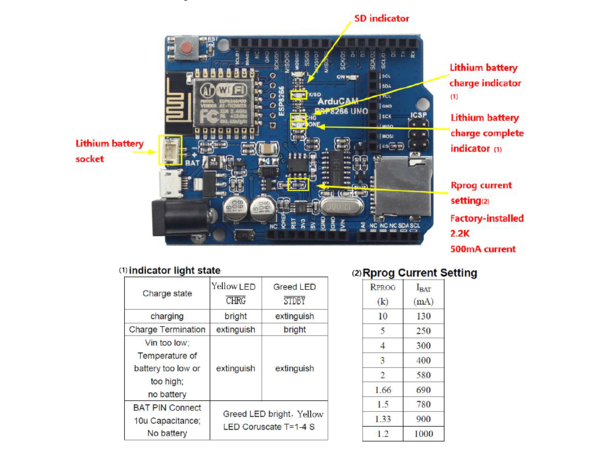
| − | <center>The board has | + | <center>The board has built-in Lithium battery charger, which accepts default 3.7V/500mA Lithium battery. The charging indicator and charging current setting can be found from the Figure.</center> |
== Software == | == Software == | ||
| − | === | + | ===Getting Started ESP32 with Arduino IDE=== |
| − | This | + | This chapter shows you how to develop an application for Arducam ESP32 UNO board using Arduino IDE. (Tested on 64 bit Windows 10 machines) |
| − | + | ====Step1:install Arducam ESP32 support on Windows==== | |
| − | + | 1. Starting Download and install the latest Arduino IDE Windows Installer from arduino.cc | |
| − | + | Download and install Git from https://git-scm.com | |
| + | Start Git GUI and run through the following steps: Select Clone Existing Repository: | ||
| − | + | Figure 4 Select Clone Existing Repository | |
| − | + | ||
| − | + | Select source and destination: | |
| + | Source Location: https://github.com/ArduCAM/ArduCAM_ESP32S_UNO.git | ||
| + | Target Directory: C:/Users/[YOUR_USER_NAME]/Documents/Arduino/hardware/ ArduCAM/ArduCAM_ESP32S_UNO | ||
| + | Click Clone to start cloning the repository: | ||
| − | + | Figure 5 Clone the Repository | |
| + | |||
| − | + | Open C:/Users/[YOUR_USER_NAME]/Documents/Arduino/hardware/ ArduCAM/esp32/tools and double-click get.exe | |
| − | |||
| − | + | Figure 6 Install ESP32 board | |
| − | + | ||
| − | + | ||
| − | + | ||
| − | + | When get.exe finishes, you should see the following files in the directory | |
| + | |||
| + | Figure 7 ESP32 board directory | ||
| + | Plug your ESP32 board and wait for the drivers to install (or install manually any that might be required) | ||
| − | |||
====Step2:Using Arduino IDE==== | ====Step2:Using Arduino IDE==== | ||
| − | + | After installation of Arducam ESP32UNO board, you can select this board from the Tool->Board menu. And there several ready to use examples from the | |
| − | And there several ready to use examples from | + | File->Examples->ArduCAM. You can use these examples directly or as a starting point to develop your own code. |
| − | You can use these examples directly or as a starting point to develop your own code. | + | Start Arduino IDE, Select your board in Tools > Board menu> |
| − | Select | + | Figure 8 Board Selection |
| + | |||
| − | + | Select the example from File->Examples->ArduCAM | |
| + | Figure 6 Example Selection | ||
| − | + | Configure the camera setting | |
| + | You need to modify the memorysaver.h file in order to enable OV2640 or OV5642 camera for ArduCAM Mini 2MP or 5MP camera modules. Only one camera can be enabled at a time. The memorysaver.h file is located at C:\Users\[YOUR_USER_NAME]\Documents\Arduino\hardware\ ArduCAM | ||
| + | \ArduCAM_ESP32S_UNO\libraries\ArduCAM | ||
| − | |||
| − | + | Figure 7 Camera Configuration | |
| − | + | ||
| − | + | ||
| + | Compile and uploading | ||
| + | Click uploading the example will automatically flashed into the board. | ||
| − | |||
====Demos==== | ====Demos==== | ||
| − | There are | + | There are 4 examples for both 2MP and 5MP ArduCAM mini camera modules. |
| + | |||
| + | ===== ArduCAM_ESP32_ Capture===== | ||
| + | This example uses HTTP protocol to capture still or video over home wifi network from ArduCAM mini 2MP/5MP and display on the web browser. | ||
| + | The default is AP mode, after uploading the demo, you can search the ‘arducam_esp32’and connect it without password. | ||
| + | |||
| + | Figure 8 Mode Configure | ||
| + | |||
| + | |||
| + | |||
| + | |||
| + | |||
| + | Figure9 Identifying IP address | ||
| + | |||
| + | |||
| + | If you want to use STA mode, you should change ‘int wifiType = 1’ to ‘int wifiType =0’.The ssid and password should be modifies before uploading. | ||
| + | |||
| + | |||
| + | |||
| + | |||
| + | |||
| + | Figure10 Wifi Camera Example | ||
| + | |||
| + | After uploading, the board IP address is obtained via DHCP protocol. You can figure out the IP address through the serial monitor as Figure 10 shown. The default serial monitor baudrate setting is 115200bps. | ||
| + | |||
| + | |||
| + | |||
| + | |||
| + | |||
| + | Figure 10 Identifying IP address | ||
| + | |||
| + | Finally, open the index.html , input the IP address obtained from the serial monitor then take pictures or videos. The html files are located at | ||
| + | C:\Users\[YOUR_USER_NAME]\Documents\Arduino\hardware\ArduCAM\ArduCAM_ESP32S_UNO | ||
| + | |||
| + | \libraries\ArduCAM\examples\ESP32\ArduCAM_ESP32_Capture\html | ||
| + | |||
| + | Figure 11 Example Html page | ||
| + | |||
| + | ===== ArduCAM_ESP32_Capture2SD===== | ||
| + | This example takes time elapse still photos using ArduCAM mini 2MP/5MP and then stored on the TF/SD card. The LED indicates when the TF/SD card is writing. | ||
| + | ArduCAM_ESP32_Cap ture_Demo.avi | ||
| + | |||
| + | |||
| + | Figure 12 Example ArduCAM_ESP32_Capture2SD | ||
| + | |||
| + | |||
| + | ArduCAM_ESP32_Video2SD | ||
| + | This example takes motion JPEG video clips using ArduCAM mini 2MP/5MP and then stored on the TF/SD card as AVI format. | ||
| + | |||
| + | |||
| + | |||
| + | |||
| + | |||
| + | Figure 13 Example ArduCAM_ESP32_Video2SD | ||
| + | |||
| + | |||
| + | ===== ArduCAM_ESP32_Video2SD===== | ||
| + | This example takes motion JPEG video clips using ArduCAM mini 2MP/5MP and then stored on the TF/SD card as AVI format. | ||
| + | |||
| + | |||
| − | + | ||
| − | + | ||
| − | + | Figure 13 Example ArduCAM_ESP32_Video2SD | |
| − | + | ===== ArduCAM_ESP32_Sleep===== | |
| − | + | To reduce power consumption,calling the interface function immediately goes into the Deep - sleep mode.In this mode, the chip will disconnect all wi-fi connections and data connections and enter the sleep mode. Only the RTC module will still work and be responsible for the timing of the chip. This demo is suitable for battery power | |
| + | |||
| − | |||
| − | + | ||
| − | + | Figure 14 Normal mode | |
| − | |||
| − | |||
| − | |||
| − | |||
| − | |||
| − | |||
| − | |||
| − | |||
| − | + | Figure 15 DeepSleep mode | |
| − | + | ||
| − | |||
| − | + | ||
| − | + | ||
| − | |||
| − | |||
| − | |||
| − | |||
== Trouble Shooting == | == Trouble Shooting == | ||
Revision as of 06:25, 3 May 2018
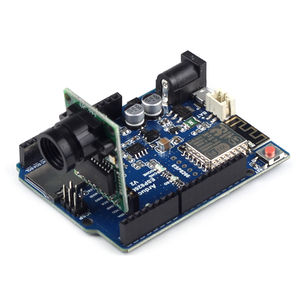
Arducam now released an ESP32 based Arduino board for Arducam mini camera modules while keeping the same form of factors and pinout as the standard Arduino UNO R3 board. The highlight of this ESP32 board is that it well mates with Arducam mini 2MP and 5MP camera modules, supports Lithium battery power supply and recharging and with build-in SD card slot. It can be an ideal solution for home security and IoT camera applications.
Contents
Pictures
Hardware
Features
- Build in ESP-32S Module
- 26 digital input/output pins, IO ports are 3.3V tolerant
- Arducam Mini 2MP/5MP camera interface
- Lithium battery recharging 3.7V/500mA max
- Built-in SD/TF card socket
- 7-12V power jack input
- Built-in micro USB-Serial interface
- Compatible with Arduino IDE
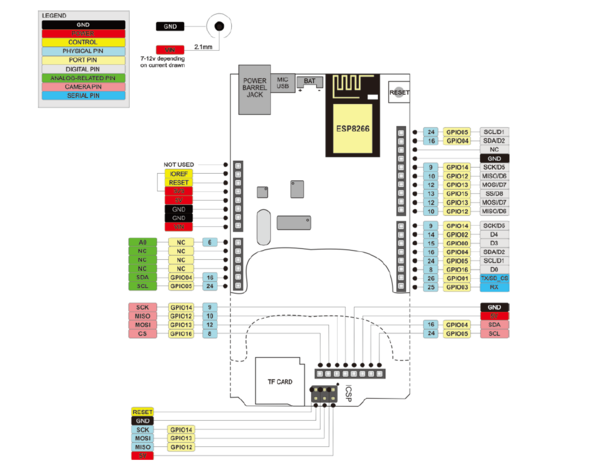
Pin Definition


Software
Getting Started ESP32 with Arduino IDE
This chapter shows you how to develop an application for Arducam ESP32 UNO board using Arduino IDE. (Tested on 64 bit Windows 10 machines)
Step1:install Arducam ESP32 support on Windows
1. Starting Download and install the latest Arduino IDE Windows Installer from arduino.cc Download and install Git from https://git-scm.com Start Git GUI and run through the following steps: Select Clone Existing Repository:
Figure 4 Select Clone Existing Repository
Select source and destination: Source Location: https://github.com/ArduCAM/ArduCAM_ESP32S_UNO.git Target Directory: C:/Users/[YOUR_USER_NAME]/Documents/Arduino/hardware/ ArduCAM/ArduCAM_ESP32S_UNO Click Clone to start cloning the repository:
Figure 5 Clone the Repository
Open C:/Users/[YOUR_USER_NAME]/Documents/Arduino/hardware/ ArduCAM/esp32/tools and double-click get.exe
Figure 6 Install ESP32 board
When get.exe finishes, you should see the following files in the directory
Figure 7 ESP32 board directory Plug your ESP32 board and wait for the drivers to install (or install manually any that might be required)
Step2:Using Arduino IDE
After installation of Arducam ESP32UNO board, you can select this board from the Tool->Board menu. And there several ready to use examples from the File->Examples->ArduCAM. You can use these examples directly or as a starting point to develop your own code. Start Arduino IDE, Select your board in Tools > Board menu> Figure 8 Board Selection
Select the example from File->Examples->ArduCAM
Figure 6 Example Selection
Configure the camera setting You need to modify the memorysaver.h file in order to enable OV2640 or OV5642 camera for ArduCAM Mini 2MP or 5MP camera modules. Only one camera can be enabled at a time. The memorysaver.h file is located at C:\Users\[YOUR_USER_NAME]\Documents\Arduino\hardware\ ArduCAM \ArduCAM_ESP32S_UNO\libraries\ArduCAM
Figure 7 Camera Configuration
Compile and uploading
Click uploading the example will automatically flashed into the board.
Demos
There are 4 examples for both 2MP and 5MP ArduCAM mini camera modules.
ArduCAM_ESP32_ Capture
This example uses HTTP protocol to capture still or video over home wifi network from ArduCAM mini 2MP/5MP and display on the web browser. The default is AP mode, after uploading the demo, you can search the ‘arducam_esp32’and connect it without password.
Figure 8 Mode Configure
Figure9 Identifying IP address
If you want to use STA mode, you should change ‘int wifiType = 1’ to ‘int wifiType =0’.The ssid and password should be modifies before uploading.
Figure10 Wifi Camera Example
After uploading, the board IP address is obtained via DHCP protocol. You can figure out the IP address through the serial monitor as Figure 10 shown. The default serial monitor baudrate setting is 115200bps.
Figure 10 Identifying IP address
Finally, open the index.html , input the IP address obtained from the serial monitor then take pictures or videos. The html files are located at C:\Users\[YOUR_USER_NAME]\Documents\Arduino\hardware\ArduCAM\ArduCAM_ESP32S_UNO
\libraries\ArduCAM\examples\ESP32\ArduCAM_ESP32_Capture\html
Figure 11 Example Html page
ArduCAM_ESP32_Capture2SD
This example takes time elapse still photos using ArduCAM mini 2MP/5MP and then stored on the TF/SD card. The LED indicates when the TF/SD card is writing. ArduCAM_ESP32_Cap ture_Demo.avi
Figure 12 Example ArduCAM_ESP32_Capture2SD
ArduCAM_ESP32_Video2SD
This example takes motion JPEG video clips using ArduCAM mini 2MP/5MP and then stored on the TF/SD card as AVI format.
Figure 13 Example ArduCAM_ESP32_Video2SD
ArduCAM_ESP32_Video2SD
This example takes motion JPEG video clips using ArduCAM mini 2MP/5MP and then stored on the TF/SD card as AVI format.
Figure 13 Example ArduCAM_ESP32_Video2SD
ArduCAM_ESP32_Sleep
To reduce power consumption,calling the interface function immediately goes into the Deep - sleep mode.In this mode, the chip will disconnect all wi-fi connections and data connections and enter the sleep mode. Only the RTC module will still work and be responsible for the timing of the chip. This demo is suitable for battery power
Figure 14 Normal mode
Figure 15 DeepSleep mode


